Organic farming Manure & Fetlizers & Bio-Stimulants
In organic farming, manures, fertilizers, and biostimulants are natural inputs that enhance soil health and plant growth. Manures, such as farmyard manure and vermicompost, are organic materials that improve soil structure and fertility over time by releasing nutrients and boosting microbial activity. Organic fertilizers are derived from plant and animal waste, slowly releasing essential nutrients for plants. Biostimulants are natural substances (like humic acids or seaweed extracts) or microorganisms that stimulate natural plant processes, improving nutrient uptake, root development, and stress tolerance without directly supplying nutrients themselves.
Jeevamrutha Details & Preparation
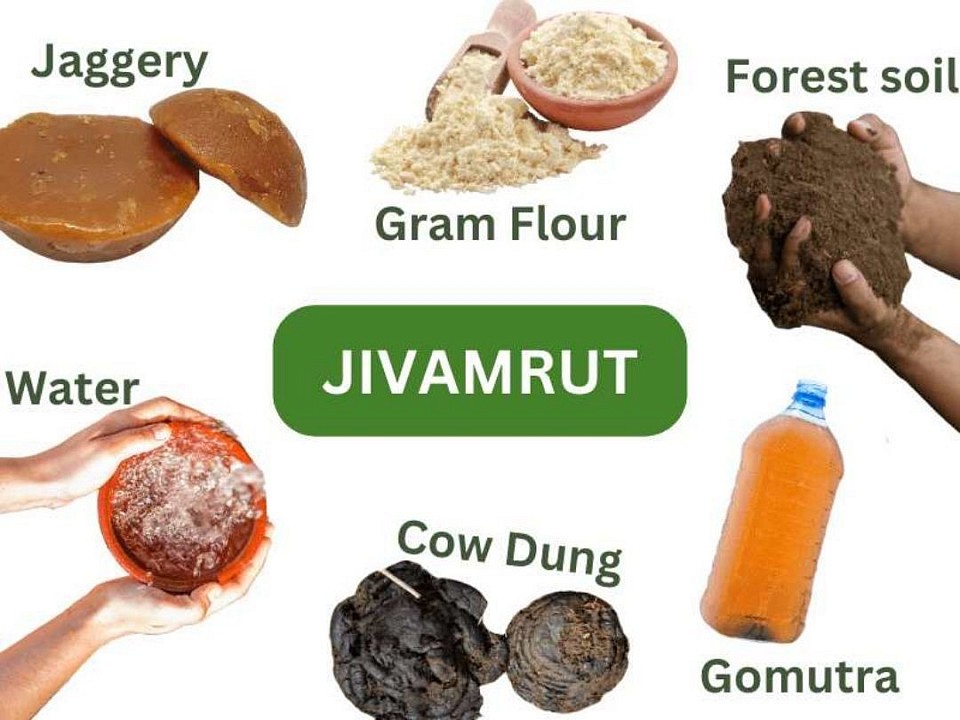
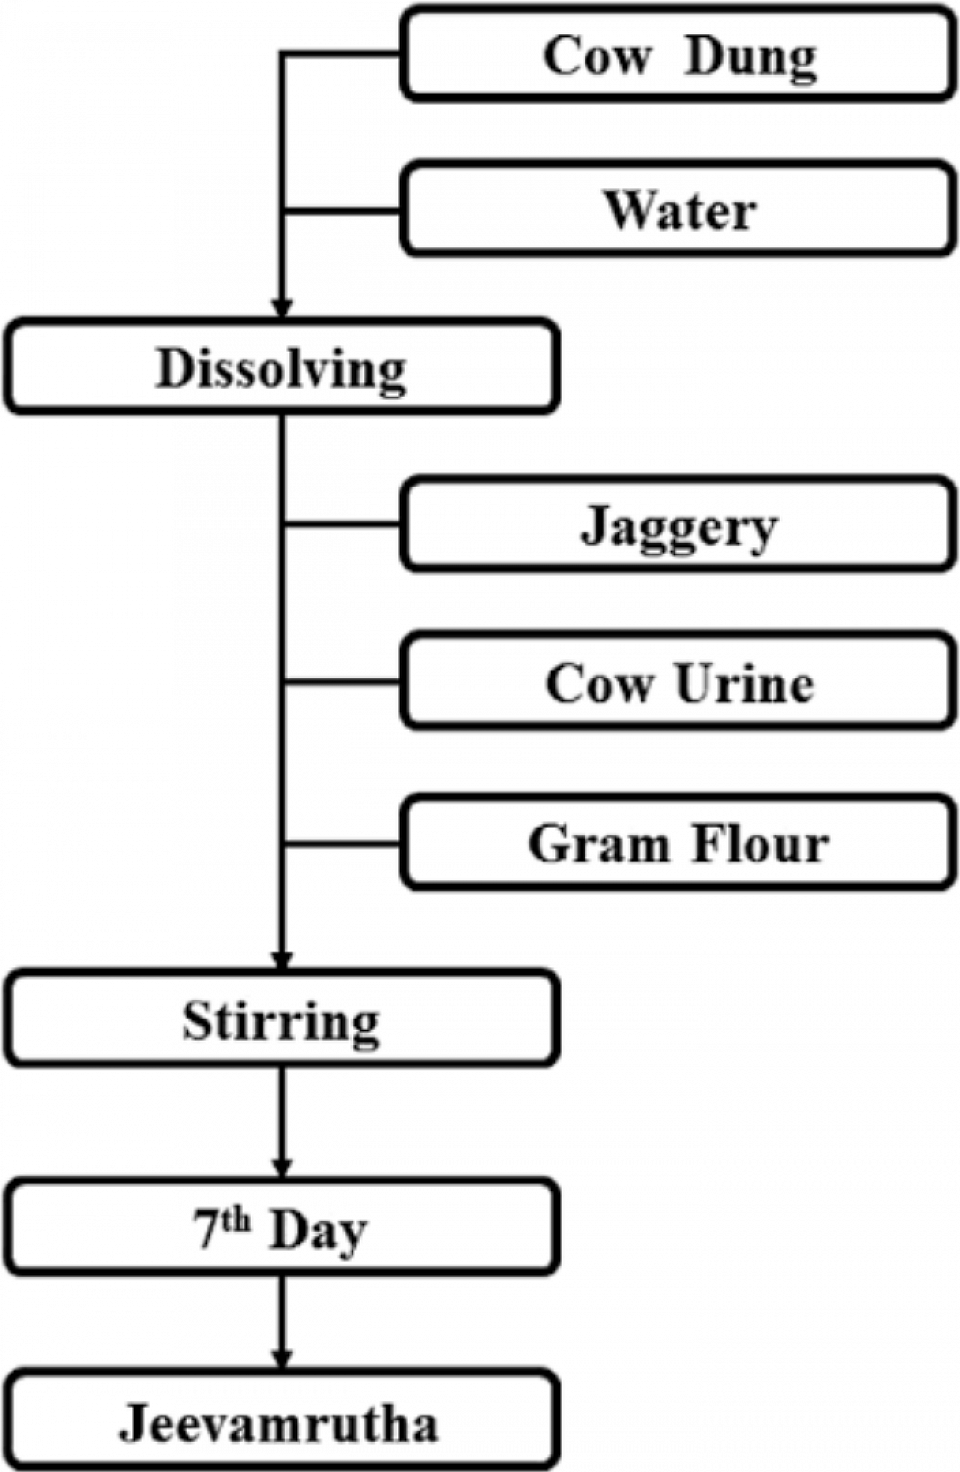
To prepare Jeevamrutha, add 200 liters of water to a container and mix in 10 kg of cow dung, 5-10 liters of aged cow urine, 2 kg of jaggery, 2 kg of pulse flour, and a handful of fertile soil. Stir the mixture well, cover it with a wet gunny bag or cloth, and let it ferment in a shady spot for 48 hours to 7 days, stirring it clockwise twice daily. This creates a nutrient-rich liquid fertilizer teeming with beneficial microorganisms that enhances soil fertility and plant growth.
Ingredients
- 200 liters of water
- 10 kg of fresh, local cow dung
- 5-10 liters of aged cow urine
- 2 kg of local jaggery (brown sugar)
- 2 kg of pulse flour (e.g., gram flour, chickpea flour)
- A handful of fertile soil from the farm's bund
Preparation Steps
Combine Ingredients: In a clean 200-liter capacity barrel or drum, add water and then all the other ingredients: cow dung, cow urine, jaggery, pulse flour, and a handful of soil.
Mix Thoroughly: Mix all the ingredients well using a wooden stick to ensure they are well incorporated.
Ferment: Cover the container with a wet gunny bag or cloth and place it in a shady, cool spot.
Stir Daily: Stir the mixture vigorously in a clockwise direction twice a day (morning and evening) for 48 hours to 7 days, depending on the temperature.
Ready for Use: After the fermentation period, the Jeevamrutha is ready.
Uses and Application
Application: Dilute the prepared Jeevamrutha with water (e.g., 1 liter of Jeevamrutha to 4 liters of water) and apply it to the fields through the irrigation system or as a 10% foliar spray.
Benefits: Jeevamrutha acts as an organic fertilizer, increasing the microbial count and friendly bacteria in the soil. It also enhances soil fertility, improves the quality of grains, and increases earthworm populations, which helps in improving the soil's structure and water-holding capacity.
Panchagavya Prepration & Details
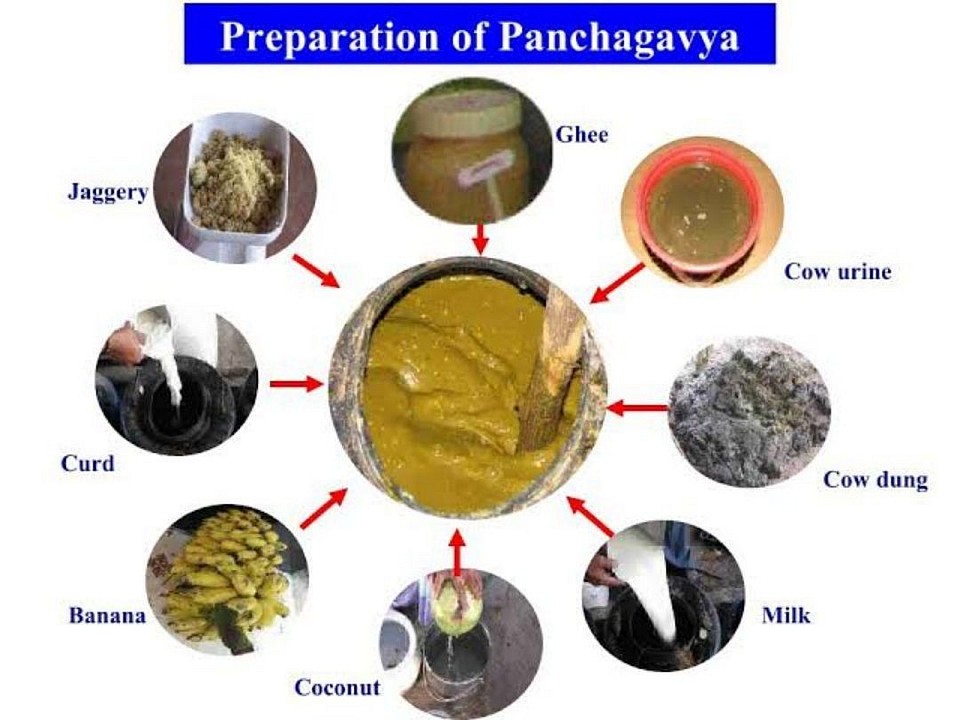
To prepare Panchagavya, a traditional mixture used in organic farming, you combine cow dung, cow urine, milk, curd, ghee, jaggery, tender coconut water, and ripe bananas in a wide-mouthed container. The mixture undergoes a fermentation period of 15-30 days in a shaded area, with regular stirring twice daily to facilitate the process, after which it is diluted with water and used as a liquid fertilizer.
Ingredients
The traditional recipe for Panchagavya includes the following ingredients:
Cow dung, Cow urine, Cow milk, Cow curd, Cow ghee, Jaggery, Tender coconut water, Ripe bananas, and Water.
Preparation Steps
Mix initial ingredients: Begin by mixing fresh cow dung with cow ghee in a wide-mouthed container like a mud pot or plastic barrel.
Ferment the first mixture: Cover the container with a breathable cloth and allow this mixture to ferment for three days, stirring it twice daily.
Add subsequent ingredients: After three days, add cow urine, cow milk, curd, tender coconut water, jaggery, and ripe bananas (mashed into a paste) to the container.
Ferment the complete mixture: Stir the mixture well and cover the container again. Continue to stir it twice daily for a period of 15 to 30 days.
Finalize the product: The Panchagavya is ready after the fermentation period is complete. You can sieve the liquid to remove undissolved solids and store it in a cool, dry place.
Key Considerations
Container: Use a wide-mouthed container made of mud, concrete, or plastic.
Fermentation: Regular stirring is crucial to aid the fermentation process and prevent sedimentation.
Storage: Store the prepared Panchagavya in a cool, dry place.
Smell: A properly prepared mixture should have a pleasant, toddy-like smell, not an unpleasant sewer-like odor.

Beejamrit Details & Prepration

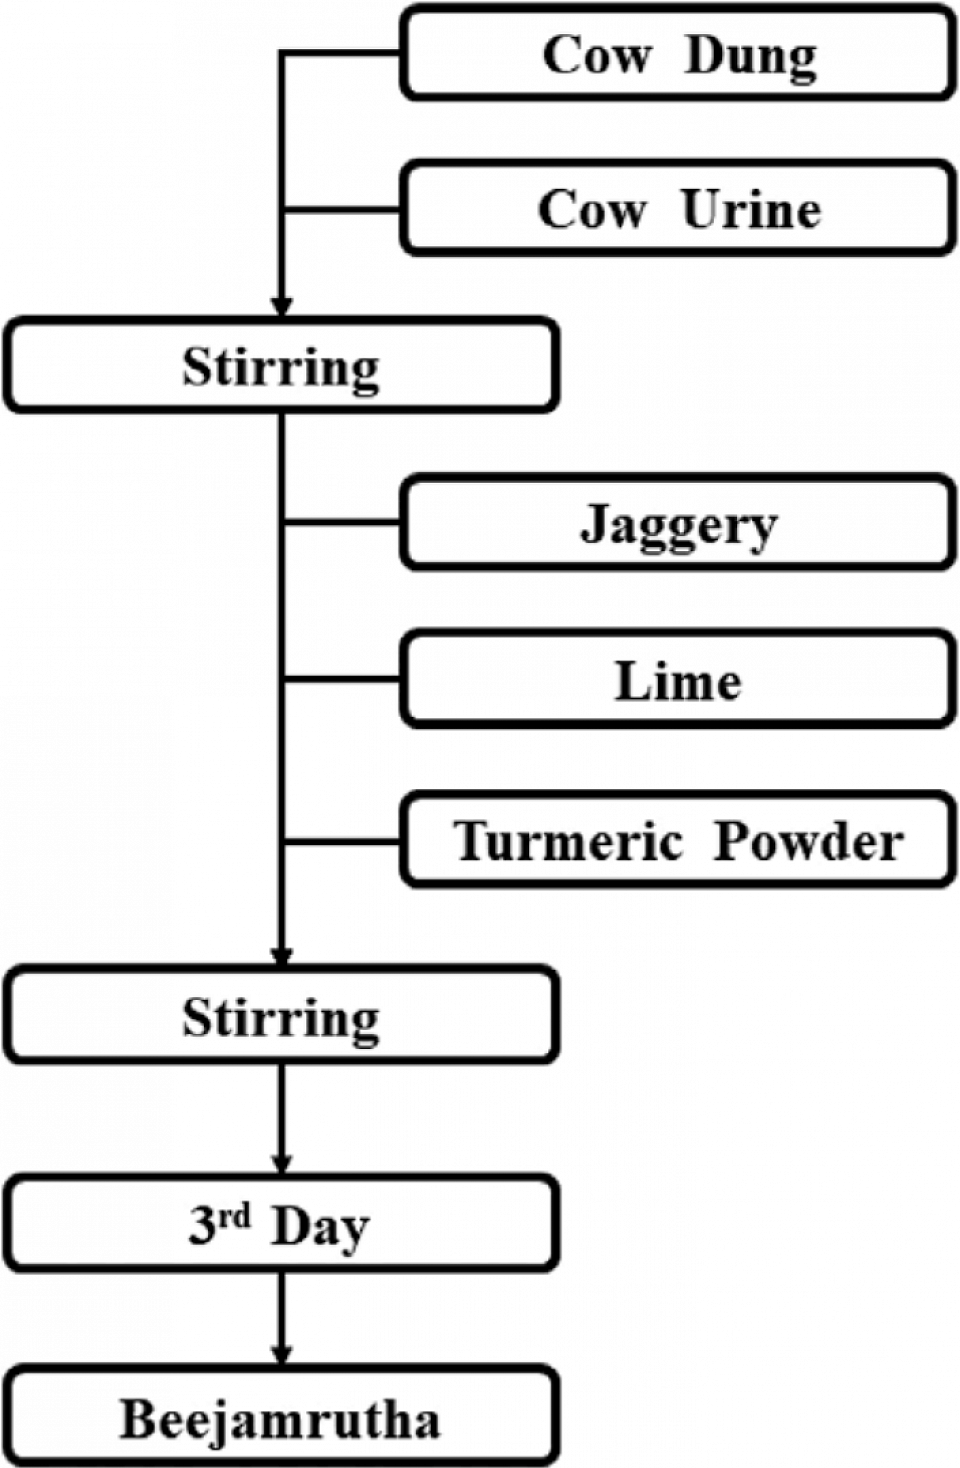
To prepare Beejamrit, mix 5 kg of fresh cow dung, 5 liters of cow urine, 50-100 grams of lime (or calcium chloride), and a handful of forest or ant hill soil with 20 liters of water. Soak the cow dung in water for 12 hours, then squeeze it into the mixture with the other ingredients and stir well. Allow the mixture to ferment for 24 to 48 hours before using it to coat seeds or dip seedling roots.
Ingredients
Fresh desi cow dung: 5 kg
Desi cow urine: 5 liters
Lime: (or calcium chloride): 50-100 grams
Virgin soil: (from forests or ant hills): A handful (approx. 50-100 g)
Water: 20 liters
Preparation Steps
Prepare the cow dung bag: Place 5 kg of fresh cow dung in a thin cloth and tie it.
Soak the dung: Hang the bag in a bucket containing 20 liters of water for 12 hours.
Prepare the lime solution: Dissolve 50-100 grams of lime in 1 liter of water and let it sit overnight.
Combine the ingredients: Squeeze the cow dung bag thoroughly into the bucket of water to extract its essence.
Add other ingredients: Stir in 5 liters of cow urine, the handful of virgin soil, and the prepared lime solution.
Ferment: Stir the mixture thoroughly and allow it to ferment for 24 to 48 hours.
Application
Seed treatment: Coat the seeds with the Beejamrit mixture by rubbing them gently in your hands.
Drying: After coating, dry the seeds in the shade before sowing.
Root dipping: For seedlings, you can dip their roots into the Beejamrit mixture before planting.
Benefits
Protects seeds and seedlings from soil-borne and seed-borne pathogens.
Enhances germination, seedling vigor, and root growth.
Improves nutrient and water uptake by plants.
Promotes overall crop performance and yield.
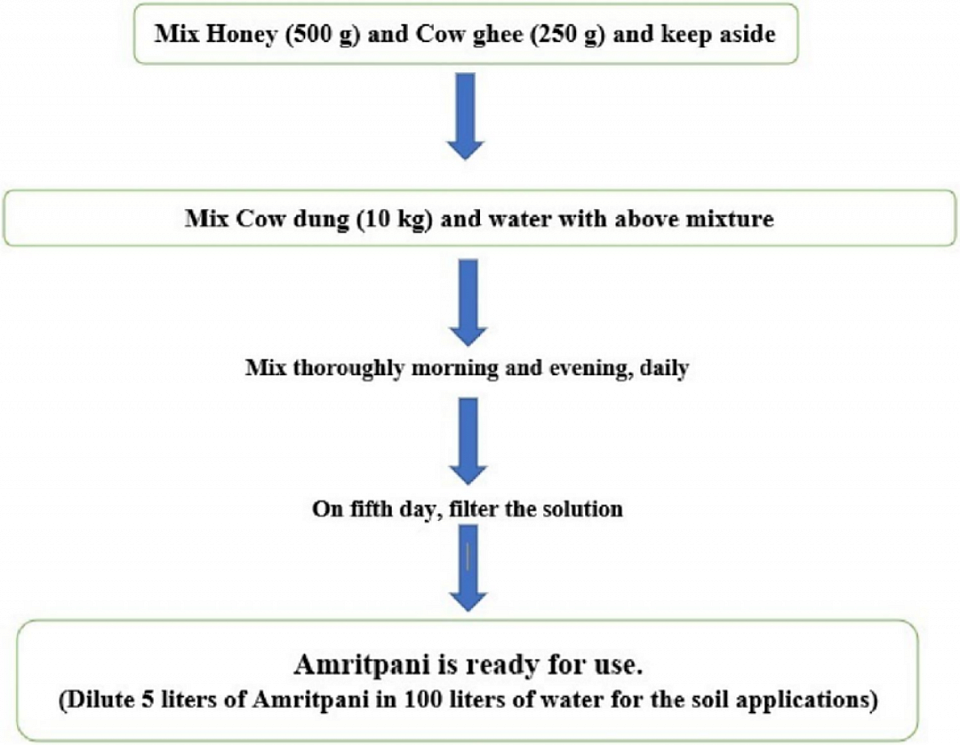
Amritpani Prepration & Details

Amritpani is an organic liquid preparation used to enrich soil and boost plant growth, made primarily from fresh cow dung, cow urine, jaggery (or molasses), and water, with alternatives to cow products suggested for some methods. The preparation involves mixing these ingredients in specific ratios and allowing them to decompose, either for a short period for immediate use or longer for a more potent mixture. The resulting liquid can then be filtered and sprayed on crops to improve soil fertility and plant health.
Ingredients (General)
Cow Dung: Fresh dung is the base material.
Cow Urine: A source of nutrients and beneficial microbes.
Jaggery/Molasses: Provides a source of energy for the microorganisms.
Water: Used as a liquid base and for dilution.
Optional additions: Some methods suggest using chickpea flour, neem leaves, or other plants to enhance the preparation.
Preparation Steps (Example based on a common method)
Mix the Base: Combine fresh cow dung, cow urine, jaggery, and water in a suitable container. For example, 10 kg of cow dung and 10 liters of cow's urine, with 1 kg of jaggery and 100 liters of water.
Blend Thoroughly: Stir the mixture well with a stick or by hand to ensure all ingredients are thoroughly mixed.
Ferment: Seal the container in a cool, dark, and dry place.
Allow to Decompose: Let the mixture sit for a period, typically from a few days to a month, allowing anaerobic fermentation to occur.
Filter and Use: After the fermentation period, the liquid can be filtered to remove solid particles and then diluted with water for spraying on crops.
Application
The filtered Amritpani is sprayed onto crops using a pump.
It serves as a bio-enhancer and can improve plant growth, yield, and quality.
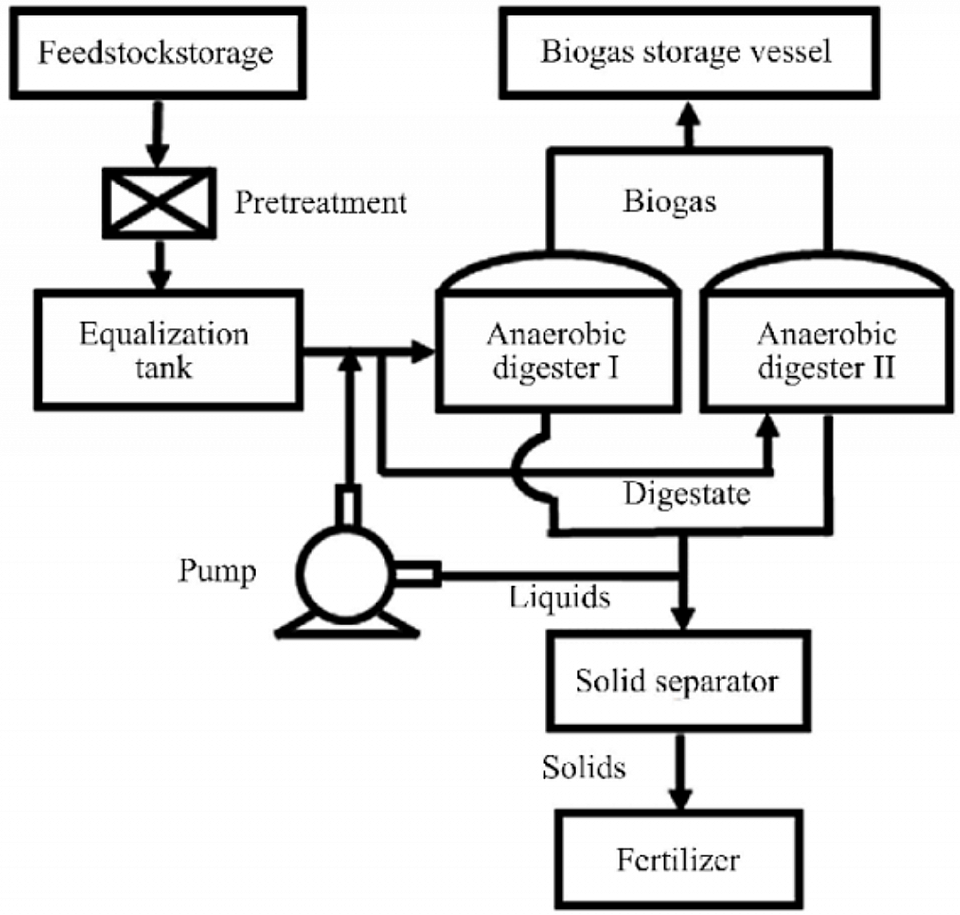
Bio-Digester Details & Prepration
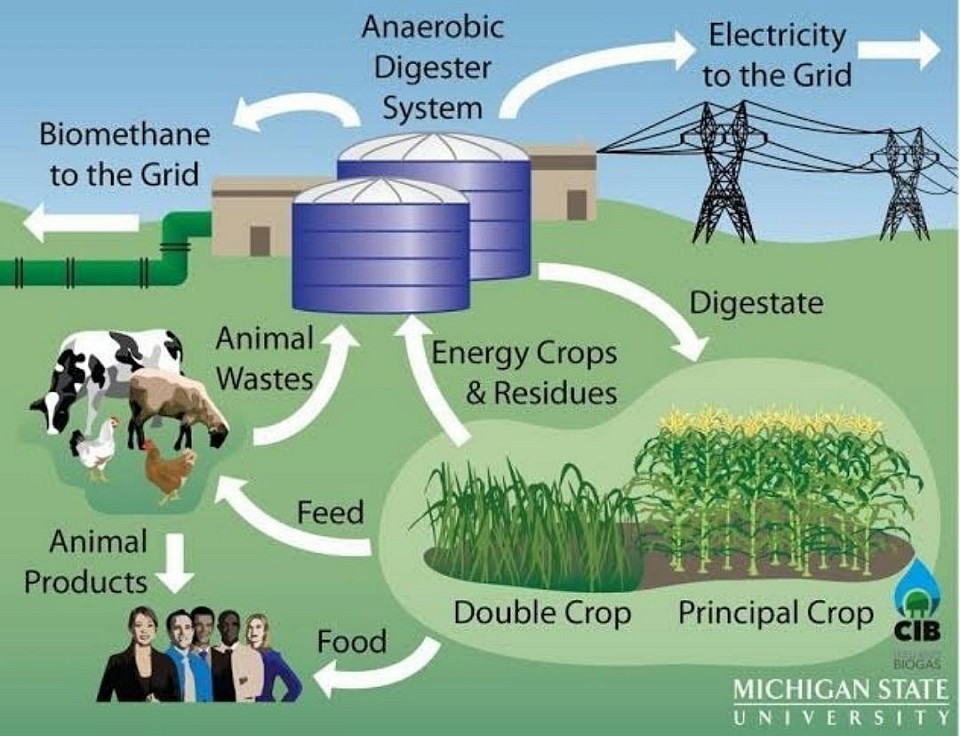
To prepare a bio-digester for agriculture, mix fresh animal dung with water (ideally a 1:1 ratio) and inoculate it with a starter culture, like cow dung and water, to introduce necessary anaerobic bacteria. The digester must be in a suitable location that maintains an optimal temperature, and the organic waste needs to be fed regularly to maintain consistent biogas production and create a nutrient-rich digestate (fertilizer).
1. Select and Prepare the Digester
- Site Location: Choose a sunny spot that offers protection from strong winds and potential flooding.Temperature: The digester needs an optimal temperature range, typically 20-40°C, for the bacteria to thrive.
- Proximity: Consider the distance to your source of organic waste (feedstock) and where you will use the biogas.
2. Gather and Prepare the FeedstockOrganic Waste: Collect organic materials such as animal dung, kitchen scraps, or agricultural waste. Pre-treatment: Shredding the waste into smaller pieces increases the surface area for bacterial action, improving the efficiency of the digester.
Mixing: Mix your organic waste with water to create a slurry. The ideal ratio is often 1 part waste to 1 part water, but some systems use different ratios for optimal slurry consistency.
3. Inoculate the DigesterStarter Culture: The first step in preparing the digester is to introduce a "starter" culture of anaerobic bacteria. Cow Dung Solution: A mixture of fresh cow dung and water (about 1:1 ratio) works well as an inoculant.
Retention Time: After inoculation, allow the system to sit for a period, typically 12-15 days, to allow the bacteria to establish themselves and begin producing gas. 4. Feed and Operate the DigesterRegular Feeding: Once the initial gas production begins, you should add new organic waste and water regularly to maintain the process.
Continuous Process: The incoming new waste pushes the older, digested material out of the system.
Monitoring: Continuously monitor the digester to maintain optimal conditions and ensure consistent biogas production and a steady output of liquid fertilizer (digestate).
5. Utilize the Products Biogas: The biogas produced can be collected and used for cooking, lighting, or even generating electricity.
Digestate: The remaining liquid, called digestate or bio-slurry, is a nutrient-rich fertilizer that can be directly applied to agricultural fields for crop production
Organic Neem Spray

To prepare an organic neem spray, mix 5-10 ml of pure, cold-pressed neem oil with 1 liter of water and 1-2 ml of liquid dish soap as an emulsifier. Combine the soap with warm water in a sprayer, then slowly add the neem oil, and shake well to combine. Spray the diluted solution thoroughly on plant leaves in the early morning or late afternoon to avoid sun damage and pest resistance.
Ingredients
Neem Oil: Use a high-quality, 100% pure, cold-pressed neem oil for best results.
Water: Warm water helps the ingredients mix better.
Emulsifier: A mild liquid dish soap is essential to bind the oil and water together, preventing the oil from floating on top.
Preparation Steps
Prepare the solution: In a spray bottle or sprayer, add the liquid soap to warm water and mix it thoroughly.
Add the neem oil: Slowly add the recommended amount of neem oil to the soapy water mixture.
Emulsify: Shake the sprayer well to combine the ingredients, creating a uniform mixture.
Application
Test: Before widespread application, spray a small part of a single leaf to check for any adverse reactions.
Spray: Generously spray the entire plant, ensuring coverage on both the upper and lower surfaces of leaves, stems, and crevices.
Timing: Apply in the early morning or late afternoon to avoid direct sunlight, which can reduce effectiveness and potentially burn the leaves.
Frequency: Apply every 7-14 days for preventative measures, or weekly for existing pest problems until the issue is resolved.
Important Details
Active Ingredients: High-quality neem oil contains azadirachtin, which acts as a growth disruptor, making it difficult for insects to reproduce and feed.
Benefits: Neem oil controls various pests like whiteflies, aphids, and thrips while being relatively safe for humans, pets, and beneficial insects like bees and butterflies.
Storage: Store any unused solution in a cool, dark place away from direct sunlight.
Organic Fish Amino Acid

To make organic Fish Amino Acid (FAA), mix a 1:1 ratio of native fish waste and jaggery (or brown sugar) in an airtight plastic container, ensuring no water is added. Ferment the mixture in a cool, dark place for 30-45 days, shaking daily to allow oxygenation. After fermentation, filter the liquid to separate it from the solid waste, resulting in a nutrient-rich liquid fertilizer for plants.
Ingredients:
Fish Waste: Use low-cost, native fish parts, including waste, skin, heads, scales, and bones.
Jaggery: Use jaggery (or brown sugar) as a sugar source for the fermentation process.
Equipment:
Airtight plastic or glass jar or bottle
Nylon mesh or filter for straining
Preparation Steps:
Chop the Fish: Cut the fish waste into small pieces to speed up the decomposition process.
Combine Ingredients: In an airtight jar, mix the fish waste and jaggery in a 1:1 ratio by weight. Do not add water.
Seal and Ferment: Tightly seal the jar to create an airtight environment.
Allow to Ferment: Store the jar in a cool, dry place away from direct sunlight for 30 to 45 days.
Mix Daily: Shake the jar twice a day to supply oxygen to the beneficial bacteria, which helps speed up the fermentation process.
Filter the Liquid: After fermentation, the solid waste will have decomposed into a liquid. Filter this liquid through a nylon mesh to remove any remaining solids.
Store the FAA: The resulting liquid is the Fish Amino Acid, which can be stored for up to three months.
How it Works:
The fermentation process breaks down the fish waste, converting the proteins and other components into amino acids, which are readily absorbed by plants. This creates a natural, nitrogen-rich fertilizer that boosts plant immunity, improves soil fertility, and enhances plant growth.
Organic Seaweed Extract
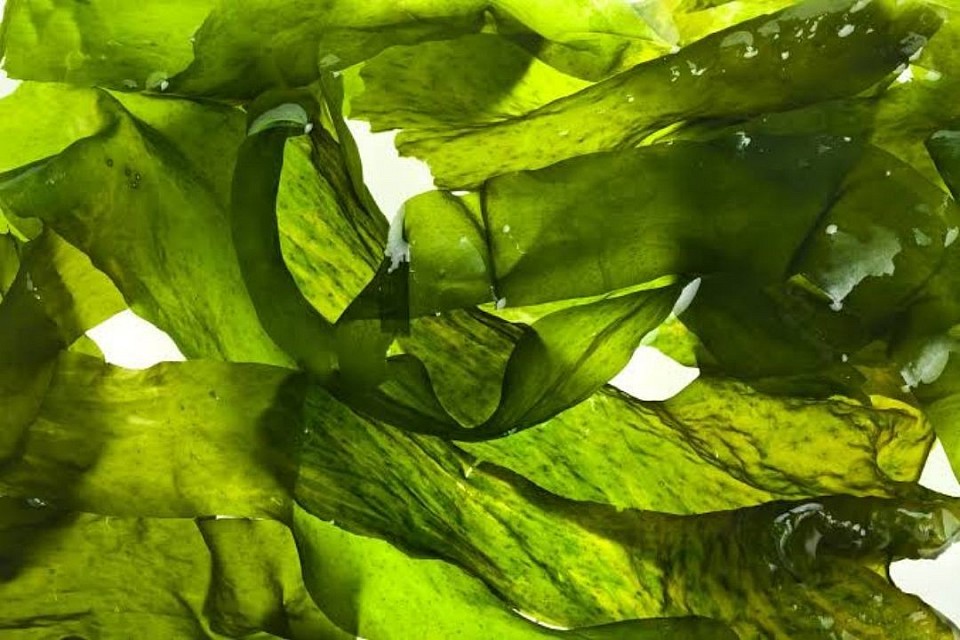
To prepare organic seaweed extract, wash and clean collected seaweed, then blend or chop it into small pieces. The seaweed can then be soaked in water (or boiled) for an extended period to extract beneficial compounds. After soaking, strain the liquid from the solid seaweed material, resulting in a concentrated extract that can be diluted with water for use as a plant fertilizer or biostimulant.
1. Seaweed Collection & Cleaning
Collection: Collect fresh, unroasted seaweed from a clean source.
Cleaning: Wash the collected seaweed thoroughly to remove any salt, sand, or other debris and contaminants.
2. Processing the Seaweed
Chopping/Blending: Cut the cleaned seaweed into smaller pieces or use a blender to reduce the surface area, which helps speed up the extraction process.
Drying (Optional): Some methods suggest shade-drying the seaweed before pulverizing it.
3. Extraction Method
Soaking: Place the chopped seaweed in water and soak it for a prolonged period, such as 5 to 10 hours, or even several weeks for a more concentrated fertilizer.
Boiling (Alternative): Alternatively, boil the seaweed in water for a shorter period (e.g., 30 minutes) to extract the compounds.
Shaker/Stirring: Agitate the mixture in a shaker or by stirring for several days to maximize extraction.
4. Straining the Extract
Filtering: Use a cheesecloth, Whatman filter paper, or other fine mesh material to strain the liquid from the solid seaweed. This separates the soluble compounds from the pulp, yielding a liquid extract.
5. Usage and Storage
Dilution: The concentrated liquid extract is potent, so it should be diluted with water before applying to plants.
Application: The diluted mixture can be applied to seedlings or mature plants as a fertilizer.
Storage: Store the finished extract in an airtight container for a limited time (up to three weeks), or use it immediately to prevent it from developing a bad odor. For longer-term use, it can be air-dried or lyophilized into a powder.
Compost Tea
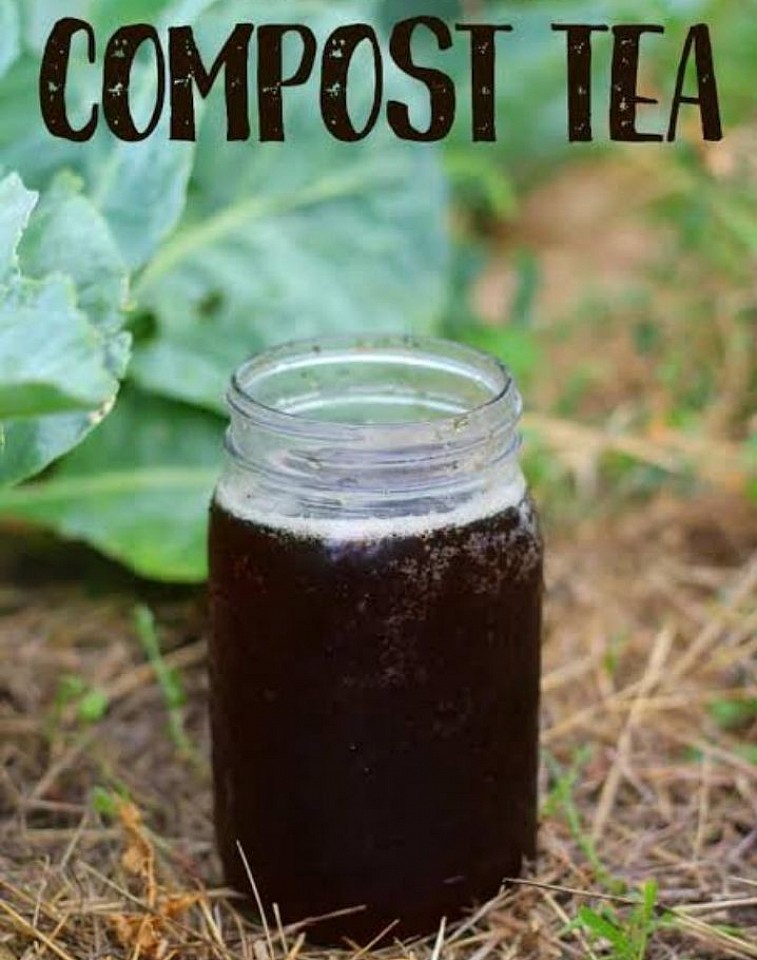
To prepare organic compost tea, steep 2–5 cups of finished compost in 5 gallons of non-chlorinated water for 24–48 hours, optionally adding molasses or kelp as food for the microbes. While stirring daily, brew the tea until a white foam appears, then apply it to your plants as a soil drench or foliar spray within four hours to maximize its benefits from the active microbes.
MaterialsWater: Use non-chlorinated water like well water or rainwater. If using tap water, let it sit for 24 hours to allow chlorine to evaporate. Compost: 2–5 cups of high-quality, finished organic compost.
Food Source (Optional): 1 tablespoon of unsulfured molasses, liquid kelp, or fish hydrolysate to encourage microbial growth. Brewing Container: A 5-gallon bucket is a common size.
Brewing Aids: A tea bag or burlap sack for the compost and an air pump for aeration are beneficial, though not always necessary.
InstructionsPrepare Water: Fill the bucket with non-chlorinated water. If using tap water, let it sit for at least 24 hours to dechlorinate. Add Compost: Place the compost in the tea bag or directly into the water.
Add Nutrient Source (Optional): Stir in molasses, kelp, or fish fertilizer to feed the microbes. Aerate: With an air pump, provide aeration for 12–36 hours. If using a passive method, stir the mixture vigorously for 2 minutes and then continue to stir daily or twice daily.
Brew: Allow the tea to steep for 24 to 48 hours. The tea is ready when a sweet, earthy smell and white foam appear on the surface, but it should not overflow with bubbles.
Strain and Apply: Strain the liquid to remove the solids. Use Immediately: Apply the compost tea to your plants as a soil drench or a foliar spray as soon as it's ready.
Tips Use Quickly: Apply the tea within four hours of finishing the brewing process to ensure the microbes have enough oxygen. Avoid Direct Sun: Apply the tea in the early morning or evening to protect the beneficial microbes from UV rays.
Clean Equipment: After use, disassemble and clean your brewing equipment to prevent a build-up of biofilm.
Organic Bio-fertilizers

Organic bio-fertilizer preparation involves creating a mixture of organic waste materials, such as manure and crop straw, with specific functional microorganisms and energy sources like molasses. The mixture is then fermented aerobically or anaerobically, turning into a dry, biologically active product that enhances soil fertility, nutrient levels, and plant growth. Different methods exist, including bokashi-style fermentation, using specialized fermentation strains, or cultivating beneficial organisms like Azolla.
Common Ingredients
Organic Waste: Livestock and poultry manure, crop straw, and other agricultural wastes serve as the base.
Functional Microorganisms: Specific strains of nitrogen-fixing bacteria, phosphate-solubilizing bacteria, and potassium-solubilizing bacteria are crucial.
Energy Sources: Molasses or whey provides energy to activate microbial metabolism during fermentation.
Minerals: Rock dust or ash adds essential minerals and trace elements.
Other Additives: Sometimes includes straw decomposition agents, leavening agents, or soil for additional components.
Key Steps in Preparation
Material Preparation: Crush and mix organic waste materials with mineral dust or ashes and other additives.
Microorganism Inoculation: Add the selected beneficial microorganisms to the mixture.
Fermentation:
Moisture Control: Hydrate the mixture to around 50% moisture.
Piling: Place the mixture in a pile or windrow.
Turning: Turn the pile frequently in the initial days to ensure good aeration and temperature management.
Monitoring: Monitor the temperature; once it becomes hot, turning the pile becomes less frequent.
Post-Fermentation:
Screening and Granulation: The fermented mass can be crushed and screened, then granulated for ease of application.
Drying: Drying is often the final step, especially for granulated products.
Packaging: Package the finished biofertilizer product for distribution.
Example Preparations
Bio-organic Fertilizer: Raw materials are fermented, then crushed and mixed with live microorganisms before granulation.
Bokashi Fertilizer: A mixture of manure, straw, soil, charcoal, and bran is combined with molasses, water, and yeast, then fermented in a well-covered pile.
Azolla Biofertilizer: Azolla, an aquatic fern, is grown in microplots, harvested, and dried to be used as a green manure, particularly for paddy crops.
Organic Epsom Salt ( Magnesium Sulphate )
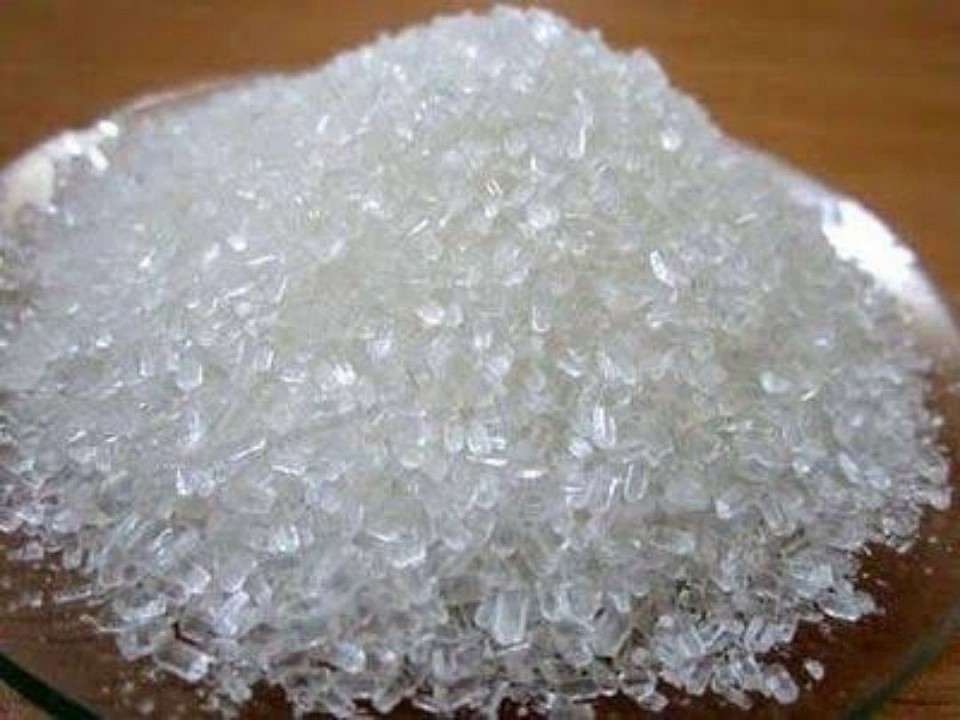
"Organic" epsom salt is simply naturally sourced magnesium sulfate (MgSO₄), often epsomite, which can be harvested from dry lake beds or produced by reacting naturally occurring minerals with sulfuric acid. There are no specific "organic" preparation details beyond sourcing it from natural deposits or synthesizing it from raw materials like magnesium carbonate (magnesite) or magnesium oxide (magnesia). The process involves mining, purifying, and crystallizing the magnesium sulfate, or it can be obtained through the dissolution of other natural magnesium sulfates.
Natural Sourcing
Harvesting: Epsom salt is naturally found in mineral deposits, particularly in dry lake beds.
Extraction: Miners extract these deposits, which are then processed to obtain the magnesium sulfate.
Artificial Synthesis
Reacting Minerals: A common synthetic method involves reacting sulfuric acid with magnesium carbonate (magnesite) or magnesium oxide (magnesia). The chemical equation for this reaction is:
H₂SO₄ + MgCO₃ → MgSO₄ + H₂O + CO₂
Treating Seawater/Industrial Waste: Magnesium sulfate can also be produced by processing seawater or industrial waste that contains magnesium. Magnesium hydroxide is first precipitated from the source and then reacted with sulfuric acid.
Purification and Crystallization
Regardless of the initial source, the magnesium sulfate must be dissolved in water and then crystallized.
This process separates the magnesium sulfate from impurities, yielding the pure white crystalline solid known as epsom salt.
Epsom salt typically refers to the heptahydrate form (MgSO₄·7H₂O), which has seven water molecules associated with each magnesium sulfate molecule.
Other Microbial Products: Products containing Pseudomonas or Azotobacter,
Other Microbial Products: Products containing Pseudomonas or Azotobacter, which are beneficial bacteria that aid in nitrogen fixation.
Products containing Pseudomonas or Azotobacter are beneficial microbial biofertilizers used to enhance crop growth and soil fertility by performing biological nitrogen fixation. These bacteria convert atmospheric nitrogen into plant-available forms, reduce the need for synthetic fertilizers, promote root development, produce growth-promoting substances like hormones, and protect against plant diseases by inhibiting pathogens.
How they work
Nitrogen Fixation: Azotobacter and certain Pseudomonas species are free-living nitrogen-fixing bacteria (diazotrophs) that convert atmospheric nitrogen (N₂) into ammonia, a form plants can absorb.
Growth Promotion: These bacteria synthesize plant growth-promoting substances such as Indole-3-acetic acid (IAA), gibberellins, and B-complex vitamins, which stimulate root development and overall plant growth.
Pathogen Control: Pseudomonas and Azotobacter can produce antibiotic substances and siderophores, which suppress the growth of harmful fungi, bacteria, and nematodes in the soil.
Improved Nutrient Uptake: They help create a stable rhizosphere environment, enhancing the plant's ability to absorb water and other nutrients, according to Indogulf BioAg.
Benefits for crops
Reduced Fertilizer Dependence: By providing nitrogen, these microbial products decrease reliance on chemical fertilizers, leading to more sustainable farming practices.
Enhanced Yield: They contribute to increased crop yield and improved overall plant performance.
Stress Tolerance: These bacteria can improve plant tolerance to environmental stresses like drought and salinity.
Key species and applications
Azotobacter : Species like A. chroococcum and A. vinelandii are used for non-leguminous crops such as vegetables, cotton, rice, and sugarcane.
Pseudomonas : Species such as P. fluorescens and P. putida form biofilms around plant roots, increasing nutrient absorption and providing a protective barrier against pathogens.
Examples of Use
Azotobacter has been shown to improve seed germination, root proliferation, and early flowering in various crops, including wheat and potatoes.
Co-inoculating Azotobacter and Azospirillum has demonstrated synergistic effects, improving root development and water uptake in crops like chickpea and mustard.
Pseudomonas and Azotobacter
To prepare a Pseudomonas and Azotobacter bio-inoculant, you first need a pure culture of each bacterium grown in specific N-free and appropriate media, respectively, then produce a liquid inoculum. This liquid is mixed with an inert carrier like charcoal or lignite powder with a specific moisture content, inoculated with the bacteria, and allowed to cure for several days to multiply the bacterial cells. The resulting carrier-based inoculant can then be applied to seeds or directly to the soil.
Steps for Preparation
Obtain Pure Cultures: Start with pure cultures of Pseudomonas and Azotobacter.
Prepare Growth Media:
For Azotobacter: Use a nitrogen-free (N-free) medium. A basic recipe includes 2 g sucrose, 0.06 g K₂HPO₄, 0.016 g KH₂PO₄, 0.02 g NaCl, 0.02 g MgSO₄, 0.05 g yeast extract, and 0.01 g K₂SO₄, with the pH adjusted to 7.
For Pseudomonas: Use a standard growth medium suitable for the specific isolate (e.g., the appropriate bromothymol blue agar) to ensure growth and confirm purity.
Cultivate the Bacteria:
For Azotobacter: Incubate in a liquid nitrogen-free medium on a rotary shaker at 30°C for 24 hours to develop the inoculum.
For Pseudomonas: Grow the culture on agar slants or in broth until it is pure and viable.
Produce Liquid Inoculum: Once the pure cultures are confirmed, develop a liquid inoculum by centrifuging the bacterial cells from the culture broth.
Prepare the Carrier Material:
Select an inert carrier material like powdered lignite or charcoal.
Ensure the carrier is screened through a 100-200 mesh sieve and neutralized by adding calcium carbonate powder.
Mix and Curing:
Mix the liquid bacterial inoculum with the prepared carrier material in a specific ratio, such as 2 x 10^7 CFU/g of lignite powder.
Maintain the moisture content of the mixture at the appropriate level (e.g., around 35-40%).
Cover the mixture in a tray with polyethylene and incubate it for 2 to 10 days at a controlled temperature (e.g., 22-24°C) to allow the bacterial cells to multiply.
Application: The final cured product is ready for use. It can be applied directly as a soil amendment, mixed into compost, or used for seed treatment.
8 Natural & Homemade Insecticides: Save Your Garden Without Killing the Earth

- Try Non-Chemical MethodsFirst
- Vegetable Oil Spray
- SoapSpray
- Neem Oil Spray
- Diatomaceous Earth
- Garlic Spray
- Chile Pepper Spray
- All-in-One Homemade Spray
- Tomato Leaf Spray
- Peppermint, thyme, and rosemary oil repellent. Mix equal parts (about 10 drops) peppermint, thyme, and rosemary essential oil in a spray bottle filled with water.
- Tobacco Spray
